废话先:好几天没有来了。是因为。没有作品可拿出来。为什么?因为小舅子要靠高中了。美术为特长。现在白天上班。晚上回家吃了饭就辅导他画画到晚上12点。我又回归到了素描时代。用笔和纸去构造方块和圆。。。。基本功力又有长进。
也许。这只是我的借口。哈哈……
1,在杂志上看到了一不错的过程。我就先不说为了大家吧。
平时自己看这类的过程都没有这么认真。就别说是E文的了。现在萌生了翻译它的想法。
这样。我就得认真去翻译。翻译的同时。他的过程也就了解了些许。哈哈。
然后贴出了。就是真的为了大家共同进步。和指出我翻译的不对的地方
看原图:
图片如下:
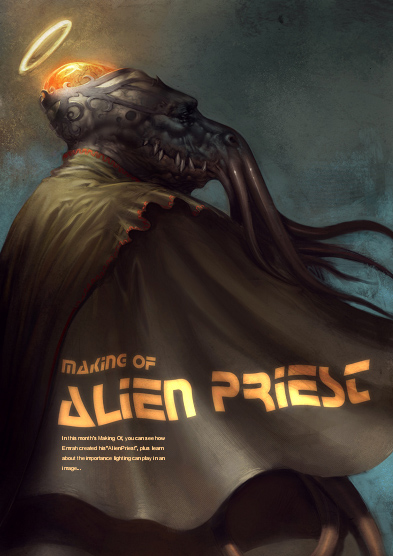
这按照分类的话应该属于
有视觉冲击的吧?
第一步骤打草稿。旁边有E文的讲解。我大概的翻译了。有错的不能包含。一定要指出来。我即时更正。谢谢
图片如下:

这是原文讲解
图片如下:

这是我翻译的
Firstly,I open a new .psd file in Photoshop. It will be vertical,
首先,我在PS中开一个新的PSD文件。It will be vertical(不会翻译,vertical
是垂直的意思)
and the resolution will be 150~200ppi.I generally start
和把分辨率设置为150~200PPI。通常开始
with a lower resolution and ramp it up later when I'm detailing the illustration,
用底分辨率并且狂乱的画它,之后当我详细设计插图的时候
enabling me to work faster and smoother.
使我的工作更快更圆滑
I creater a textured background before starting to draw,
我创造画一个有质地的背景之前,
so I get rid of the white background.
所以我要摆脱白色的背景
I open a new layer and start to sketch with some thin brushes,
我新建一个层用薄的笔刷开始打草稿
as though drawing with a sharpened pencil.
好像用(使尖锐、使敏捷、加重、消尖)的铅笔画一样。
I don't need to put a lot of detail into this stage,
我不需要表达大量的细节在这个阶段
just define the general silhouette and line.
只需明确大体的阴影和线就可以了。
----------------------------------------------------------------------
第一步骤完
----------------------------------------------------------------------
第二步骤
图片如下:

这是原版E文讲解
图片如下:

这是我翻译的。(当然有部分没有翻译的。希望猪猪和各个达人帮忙了)
Then I select the "Multiply" from the options menu of the "sketch" layer.
然后我在草图那个图层选择了“叠加”的选项。
I open a new layer under the sketch layer and start to paint roughly.
我新建立一个层在草图层下,并且开始概略的上颜色。
At this stage.I'm paying attention to get the right colours and tones.
在这个阶段。我为了得到正确的颜色和色调上付出了注意力。
Be aware of putting too much detail in at this stage.
要知道在这个阶段要画出很多的细节
Try to see the whole image without zooming in much and losing yourself in details.
尝试着看整幅的图片(缩小后)会失去很多你的细节【这话翻译的有点别扭,大概的意思
就是要缩小了看,不要被自己设想的细节局限住吧?】
For example, I generally work at %25~%50 zoom level.
举例,我通常工作在25%~50%的缩放状态
I'll use a main light source,and two secondary light sources,
我将用一个主要的光的来源和2个次要的光的来源
making decisions on my colours and applying the temperature passes,shadows etc.
来决定我的颜色和(applying the temperature passes)影音 以及其他。中间括号里的
不会翻译了(applying:涂 temperature:温度、发烧、热度 passes:落伍的)
----------------------------------------------------------------------
第二步骤完
----------------------------------------------------------------------
第三:
图片如下:
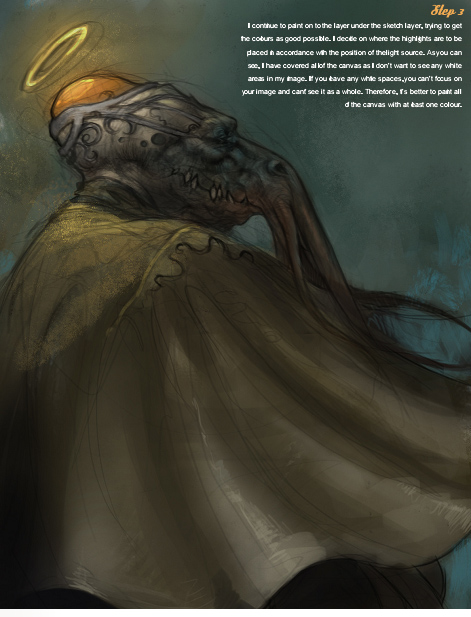
E文讲解
图片如下:

以下是我翻译的
I continue to paint on to the layer under the sketch layer,
我接着在草图层下涂画
trying to get the colours as good possible.
尝试得到更好更何时的色调
I decide on where the highlights are to be placed in accordance with the position of the
light source.
我决定何处聚焦将被安置与位置符合光源。
As you can see, I have covered all of the canvas as I don't want to see
any white areas in my image.
如同您能看, 我涂抹了我不 想要看任何白色区域在我的图象。
If you leave any white spaces,you can't focus on your image and can't see
it as a whole.
如果您留出任何白色空间, 您不能 焦点在您的图象和不能看见它整体上。
Therefore,it's better to paint all of the canvas with at least one colour.
所以, 涂抹画布的时候至少一种颜色。
----------------------------------------------------------------------
第3步骤完
----------------------------------------------------------------------
第四步
图片如下:
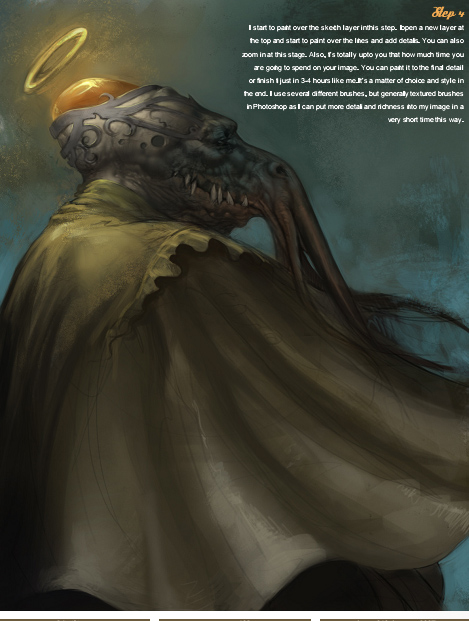
E文讲解
图片如下:
我的翻译:
I start to paint over the sketch layer in this step.
我开始在草稿层上作画在这步骤。
I open a new layer at the top and start to paint over the lines and add details.
我新建一个层在顶部并且涂抹时候覆盖了线和增加了些细节
You can also zoom in at this stage.
你同样可以缩放在这个步骤
Also,it's totally up to you that how much time you are going to spend on your image.
并且,它是由你完全决定花多少时间在你的画上。
You can paint it to the final detail or finish it just in 3~4 hours like me.
您能绘它到最后的细节或完成它像我一样的花费3~4个小时。
It's a matter of choice and style in the end.
像选择和样式这样的事情放在最后。
I use several different brushes,but generally textured brushes in Photoshop
as I can put more detail and richness into my image in a very short time this way.
我使用几把不同的刷子, 但通常质地的刷子在Photoshop 如同我能投入更多细节和丰富
我的图象在非常短时间这样。
----------------------------------------------------------------------
第4步骤完
----------------------------------------------------------------------
第五步
图片如下:
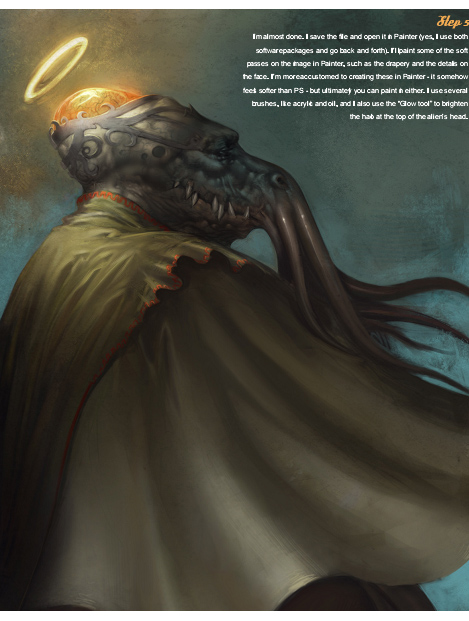
E文讲解
图片如下:

翻译:
I'm almost done. I save the file and open it in Painter(yes,I use both
software packages and go back and forth).
我几乎做完了。我保存文件,并且用PT打开它。是的。我用这2个软件反复使用
I'll paint some of the soft passes on the image in painter,such as the
drapery and the details on the face.
我将用PT画一些 soft passes (应该是苍老的元素吧)在图片上。例如脸上的纹理和细节
I'm more accustomed to creating these in pt - it somehow feels sotter
tan ps - but ultimately you can paint in either.
我更喜欢用PT创造这些。不知道为什么感觉比PS更温和。但是你也可以从始至终都在一个软件上画。
I use several brushes,like acrylic and oil, and i also use the "Glow tool"
to brighten the halo at the top of the alien's head.
我使用几把刷子, 象丙烯笔和油画笔, 并且我并且使用"Glow tool" 照亮光晕在主角的头上
----------------------------------------------------------------------
第5步骤完
----------------------------------------------------------------------
第六步
图片如下:
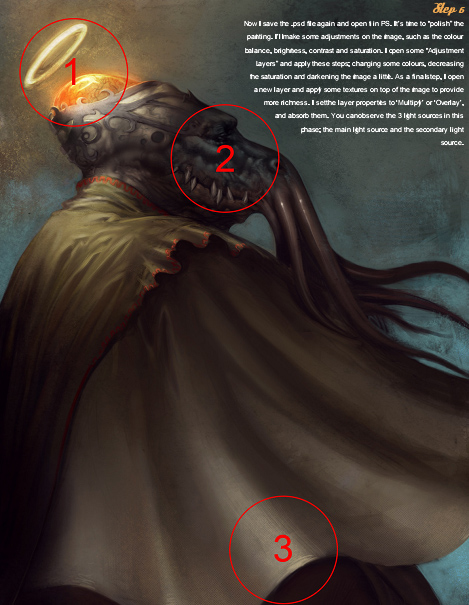
E文
图片如下:

翻译:
Now I save the .psd file again and open it in PS.
现在。我保存这个.psd文件。并重新用PS打开它。
It's time to "polish"the painting.
是时候令它更加光亮了的绘画了
I'll make some adijustments on the image,such as the colour balance, brightness,
contrast and saturation.
我准备做一些调整在这副画上。例如颜色的平衡、光亮、对比和饱和度。
I open some "Adjustment layer"and apply these steps;
在这个步骤我使用了几个调整层。(就是图层面板最下最左边的按钮增加图层样式)
changing some colours , decreasing the saturation and darkening the
image a little.
改变一些肤色, 减少饱和和使 图象变暗一点。
As a final step , I open a new layer and apply some textures on top of
the image to provide more richness.
作为最后的步骤, 我打开新层数和做一些纹理在顶部使图像显的更加丰富。
I set the layer properties to 'Multiply' or 'Overlay', and absorb them.
我设置了层的参数'Multiply--叠加' 或'Overlay--覆盖', 并且同化他们。
You can observe the 3 light sources in this phase;the main light source and
the secondary light source.
您能观察3 个光源在这个局面;主要光源和次要光源。
----------------------------------------------------------------------
第6步骤完
----------------------------------------------------------------------
最后
图片如下:
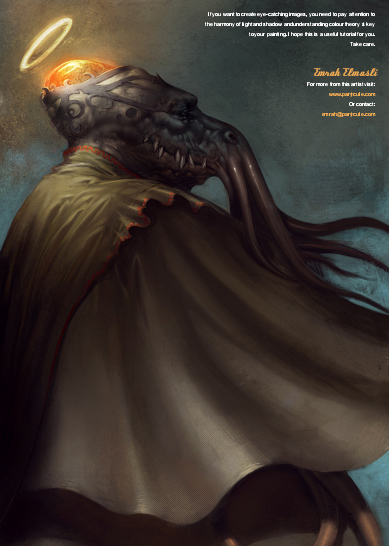
最后的话和翻译
if you want to create eye-catching images,you need to pay attention to
the harmony of light and shadow and understanding colour theory is key
to your painting. I hope this is a useful tutorial for you. take care.
如果您想要创造夺目的图象, 您需要注意协调的光和阴影和了解颜色理论是
对您的绘画的关键。我希望这是一个有用的讲解为你。小心。
www.partycule.com----------------------------------------------------------------------
第6步骤完
----------------------------------------------------------------------
全结束。


